
 Hi all! I’m very excited about today’s post. A friend of mine, who also happens to be the bartender at my favorite local dive bar, opened a food truck recently. She is just diving into the world of cooking, and let me tell you, her sandwiches are AMAZING. She is now thinking of serving her sandwiches on ciabatta bread, which just so happens to be one of my absolute favorite sandwich breads! So obviously I jumped at the opportunity to help out with the testing…mostly so I have a reason eat more brisket (I mean, why else did I move to the south if not for the BBQ?!??). Now, I’ve made ciabatta bread before, but always with a fancy French bread oven in a commercial kitchen…so here goes the scaled down, at home version!
CIABATTA BREAD Yield: 2 Loaves
- 12 oz Water (1.5 cups)
- 13.75 oz Bread Flour (3.5 cups), divided
- 0.5 oz Rye Flour, optional
- 0.5 oz Whole Wheat Flour, optional
- 2 tsp Instant Yeast, divided
- 1.5 tsp Salt
What makes this bread so flavorful and delicious is the length of time it spends in the fermentation process…so be sure you have plenty of time on your hands before tackling this recipe! The majority of it will be spent waiting for it to proof (rise); I would recommend starting it the night before you want to enjoy it! Kitchen Aid makes a great bread attachment for their mixers that would help speed up the process quite a bit.
- The first step is to make the sponge, or preferment. This is the step that you could do the night before you plan on eating your freshly baked bread. If you have a stand mixer, you can make this preferment in your mixer bowl to save washing an extra bowl!
 Add the water, 8.5 oz of bread flour (2 cups), and 1 tsp of instant yeast to your bowl, adding the water first. Mix thoroughly…I find it easiest to mix with your hand, but if that’s too messy for you, a spatula will work just fine. Wrap your bowl with plastic wrap and let it sit either overnight in your refrigerator, or for a few hours (2-3) at room temperature.
- Once your sponge has had time for the yeast to start working its magic, it’s time to actually mix the dough. If you have a stand mixer, this is the time to use your dough hook…and if you’re doing this by hand, time to work on those forearm muscles!
 Add the remaining bread flour, rye flour, whole wheat flour, salt, and yeast to your sponge and mix on speed 1 for about 5 minutes with your dough hook (or mix by hand, on a heavily floured surface). Once your dough comes together, you can turn your mixer up to speed 2 and mix another 3-5 minutes (or continue mixing by hand). This extra kneading of the dough with help to develop the gluten protein in the flour, which is what gives ciabatta bread its distinctive texture. The dough should form a ball, but will still be quite sticky.
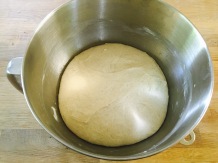
 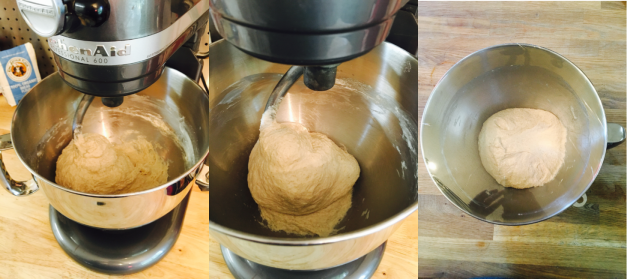 And now it’s time to wait again…place your dough ball in a bowl that has been either floured or sprayed with pan spray. Cover it with plastic wrap and let it sit at room temperature for about an hour. I always use my mixer bowl for this again…fewer dishes is always a plus in my book!
- By now your dough should be at least double the size it was when we left it an hour ago, and it should feel inflated.
 It’s time to shape the ciabatta into its final shape now…and we have a couple options. You can either bake the ciabatta into two loaves, several individual sized buns, or a full sheet (to be cut into portions after baking). I am going to do two loaves for this demonstration. Heavily flour your work surface, and dump the dough from the bowl onto the floured tabletop. Gently flatten the dough into a rough rectangle shape and divide into two equal pieces. A bowl scraper is the best tool to use when working with dough; it gives you more control than a spatula and is less messy than just using your hands.
  Roll the dough into a log shape and place on a sheet pan lined with parchment. Work the dough into your desired shape, making sure to leave space for it to expand. We’re going to let the dough sit and proof for another two hours or so now, but this time we have to protect the dough from drying out a little differently.
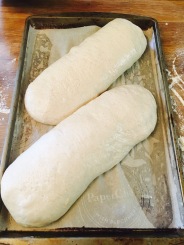
 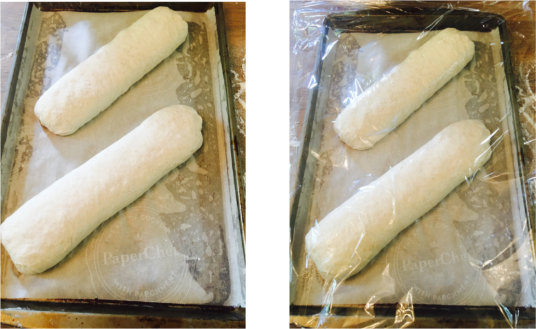 Generously spray your shaped dough with pan spray and very lightly place a piece of plastic wrap over the loaves, leaving plenty of slack for the dough to rise.
- The end of the process is near, I promise! About 30 minutes before your bread is ready to bake, preheat your oven to 500°F.
 If you have a baking stone, this is a great opportunity to use it and you can place it in your oven during the preheating. Once your oven is nice and hot, very gently remove the plastic wrap from atop your dough and sprinkle the dough with water. A spray bottle is the best way to do this, but you can also sprinkle by flicking a brush or your fingers. Turn your oven down to 425°F, place your bread in the oven on the baking sheet, or slide your bread (still on the parchment paper) onto the baking stone. Bake for about 20-25 minutes.
- When your bread is ready, it should be a light golden brown and have a hard crust. Turn your oven off, crack the door, and let your bread cool as the oven does.
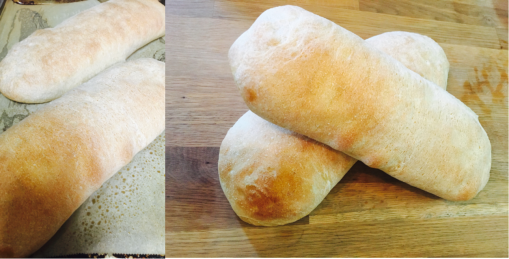 This bread is best the day it is made, but can be kept at room temperature for a few days if wrapped in plastic.
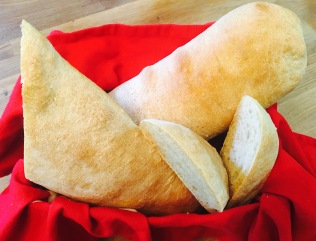
- All that’s left to do is enjoy your homemade ciabatta bread! Let me know how yours turns out and if you have any questions!!!
FlexOffers

Amazing!! Your Aunt Pat dent me this and I am impressed!! She sould be as proud as she is!
LikeLike
Yum!
LikeLike